



Proxy Integration With SwitchyOmega
This step-by-step guide will show you how to set up Anonymous Proxies with SwitchyOmega in just a few minutes.
Recommended proxy services
HTTP Proxies are handling HTTP requests towards the internet on behalf of a client. They are fast and very popular when it comes to any kind of anonymous web browsing.
SOCKSv5 is an internet protocol that is more versatile than a regular HTTP proxy since it can run on any port and traffic can flow both on TCP and UDP. Useful in games and other applications that do not use the http protocol.
What Is SwitchyOmega?
SwitchyOmega is a free browser extension that makes the management and switching between proxy profiles easy. It works without a hitch with major browsers like Google Chrome and Firefox. Instead of struggling with complicated browser menus or operating system configurations, Proxy SwitchyOmega lets you take full control of your proxies in just a few clicks.
Proxy SwitchyOmega Features:
- Easy to Use: Its intuitive interface makes proxy management simple for everyone.
- Multiple Profiles: Quickly create and switch between proxy setups as needed.
- Compatibility: Works with HTTP, HTTPS or SOCKS5 proxies.
How to Set Up SwitchyOmega with Proxies
To integrate Anonymous Proxies with SwitchyOmega, just follow these simple steps.
Step 1: Download SwitchyOmega
First of all, you have to download the SwitchyOmega extension. Below are the links for both Google Chrome and Mozilla Firefox versions:
We will now proceed with the Google Chrome version.

Step 2: Open SwitchyOmega Options
Once installed, click on the SwitchyOmega icon in your browser toolbar and select Options.

Step 3: Create a New Profile
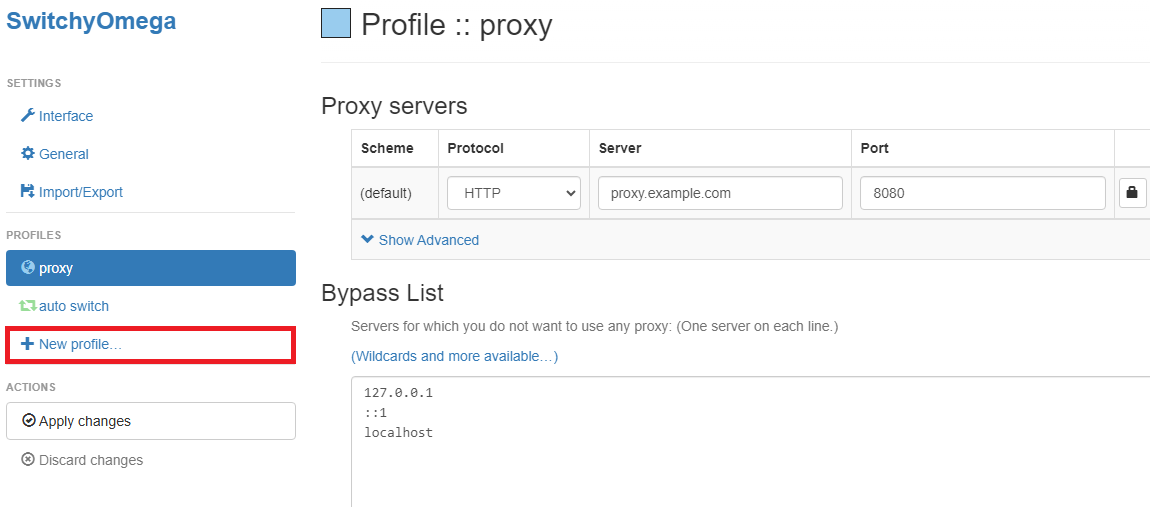
You will notice that Proxy SwitchyOmega already comes with a default proxy profile. Now, if you want to create a custom one, click on New Profile in the left-hand menu.
While Proxy SwitchyOmega is an excellent tool for managing proxies, it doesn’t provide them. However, if you want speed and security, be sure that you avoid the risks of free proxies and choose our high-quality residential or datacenter proxies, built for performance, privacy and peace of mind.
Step 4: Name Your Profile
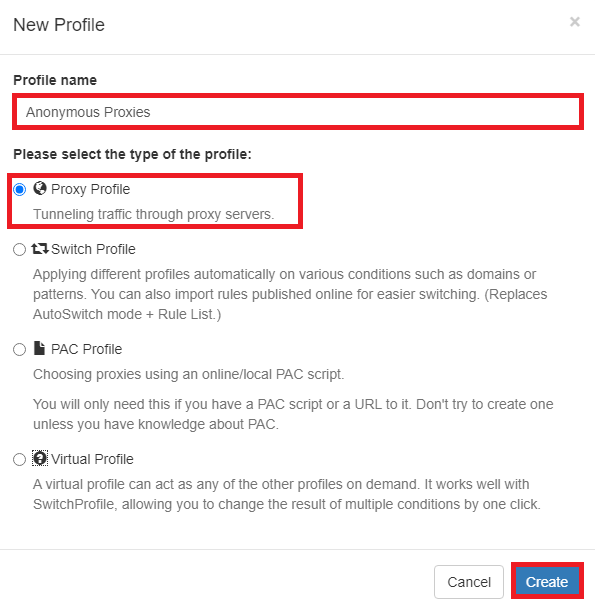
A New Profile window will pop up and here we'll need to type in the profile name and select the type of the profile, which is gonna be Proxy Profile. Then, just click on the Create button.
Step 5: Enter Proxy Details
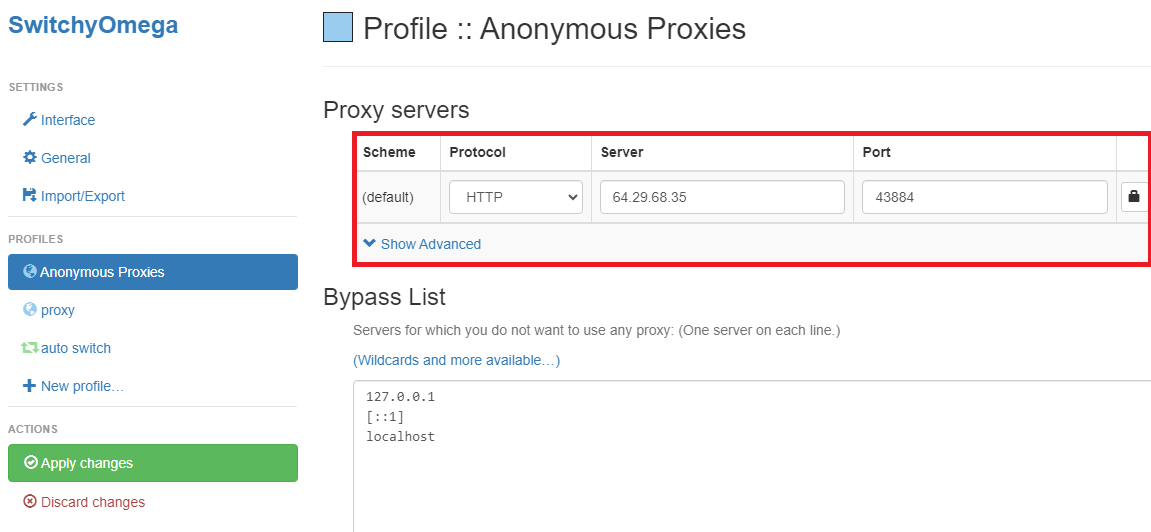
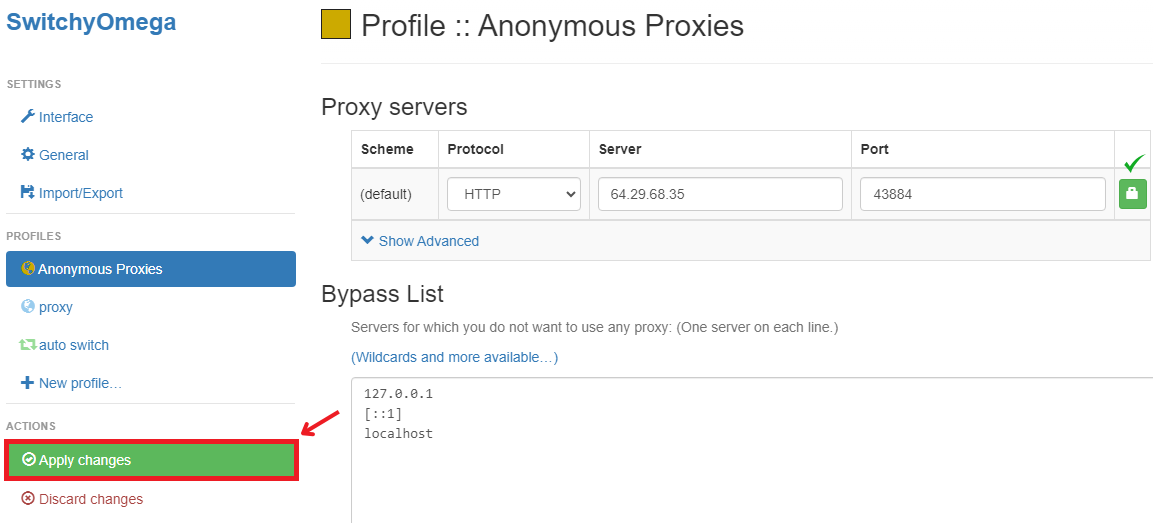
Once the new profile page opens, we need to enter proxy details. You can simply grab them from Anonymous Proxies Dashboard.
- Protocol: Begin by selecting the type of proxy you’ll be using—HTTP, HTTPS, or SOCKS5—based on your specific needs.
- Server: Input proxy server address. For example:
200.23.56.8. - Port: Input port number. For example:
80.
Step 6: Authenticate the Proxy
If your proxy requires authentication, please click on the lock icon next to the server and port fields.

Once done, input your credentials as described below.
- Username: Use the username provided in Anonymous Proxies dashboard.
- Password: Same for the password.
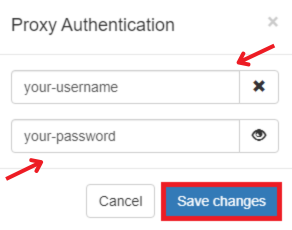
Then, just click on Save changes.
Skip the authentication step if your proxy's IP is already whitelisted.
Step 7: Apply Changes
Once you've entered your credentials, click the Apply Changes button to save your proxy configuration.
Step 8: Enable the Proxy Profile
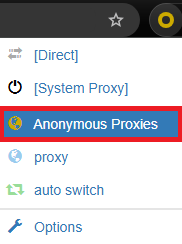
To activate your newly created proxy profile, click on the Proxy SwitchyOmega extension icon and select the profile you just created.
Wrap Up
SwitchyOmega is a really powerful and flexible extension that makes it super easy to integrate and manage proxies. And the best part about it, is that it is completely free!
If you have any questions about setting up Anonymous Proxies with SwitchyOmega, our support team is here to help. For more integration tutorials, be sure to check out our integrations page.